The Beginners Guide to: Reports & Data

Photo by Carlos Muza on Unsplash
This month’s Register Now scoop is about all things Reports, super bland we know, but highly important and can often be a busy event organiser’s complete undoing at the 11th hour…
In fact, every week we regularly get calls at 5pm on a Friday arvo from stressed organisers because they haven't planned out their post closing data requirements. Like all big projects and pieces of work, planning and preparation is the most important element to events!
This is where an understanding of our reporting functionality and knowing where and what your data is can really help for a smooth event execution and all round solid experience for your participants.
By the way, if you want a few pointers of the kind of things you need to consider from a registration process perspective, a week out from your event, check out our pre-flight checklist here.
Back on topic... Presumably you have already set up and tested your event correctly – otherwise you wouldn’t be up and running yet! So now it’s all about exporting this data and creating some useful reports to distribute and share with your team, volunteers, suppliers and so on.
We’ve already gone to the trouble of setting up six standard reports in the platform, so we’ll give you a quick refresher of what they’re for, what data they produce and how to use them, then we’ll take a deeper dive into how you can customise and create your own reports!
First things first let's unpack some of our standard reports
If you don't know how to download or access reports click here for a guide, you can also set up custom reports for your event, which will also copy over year to year when you clone your event, but we’ll come back to that later on.
Simple Participant List
This report probably has the highest use of all reports and provides a high level snapshot of the basic fields that you may need to know about each registered (paid) participant in your event. You can see all the fields below:
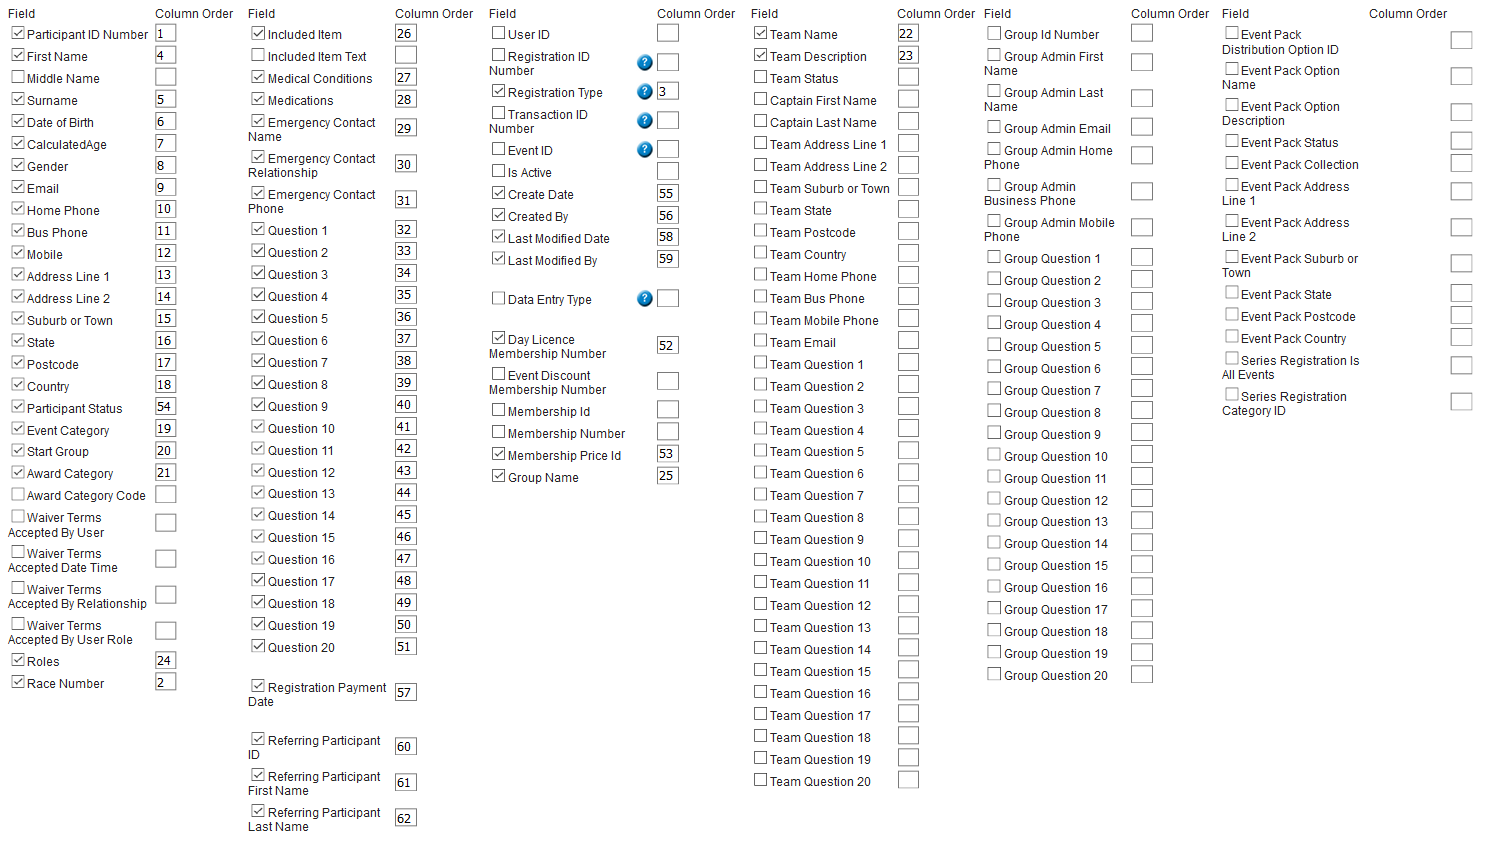
Many clients will use this report to work off as their primary participant database as it gives a good general overview of each paid record.
At the basic level it includes each individual participant’s demographic details, address and contact details, event category, subcategory and award categories, included items, medical & emergency contact details and any participant questions set up by the organiser. You can create a custom version of this report to include more or less information - but will come back to that later!
Full Detail Participant List
This report is a spin off of the Simple Participant List above, but on steroids! It includes all database fields for each registered participant - you probably would only need to use this on occasion, or you may just use it to access certain information such as Waiver information.
Charge Item Report
The Charge Item report contains a record of each charge item for every participant, including registration fees, donations, merchandise, included items and any other charges that you may have associated with your event.
Please note in understanding how this report reads, if a participant has paid $50 for their registration fee and purchases a T-Shirt for $30 then this person will have two event charges. These charges will be expressed in two separate rows in the spreadsheet, one right after the other and not in the same row - see below image for example. This report can be customised to include only certain charges and of course you can filter the data yourself within excel.

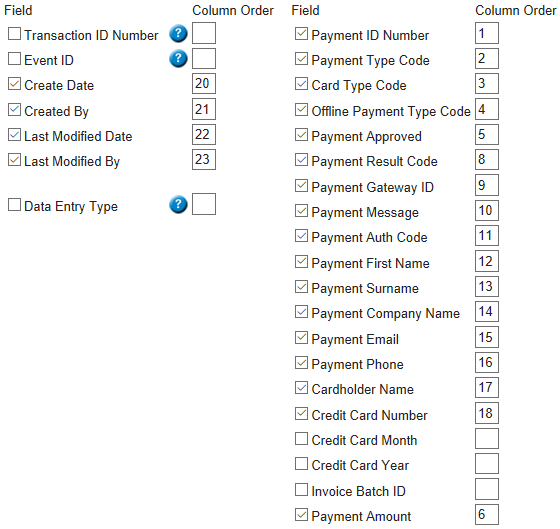
Payment Report
The Payment Report contains details for each payment made on your event, it will also show important information such as when the payment was made and information about the payment instrument used. In some situations payment contact details will differ to the registration details - eg in parent / child or corporate team situations.
In scenarios where one person has paid for two or more entries, then only one payment record will be shown.
This report will pull the following information from the transactions made in your event.
Promotion Code Report
The Promotion Code report contains a list of all the people who have used a promotion code to discount their event registration. To learn more about the promo code function check out our solutions page.
Team Report
This is a relatively new report in our system and it will only be available if the team function is turned on for your event. This report displays as one row per team with columns for each team member. It provides helpful information about each team including: team status, payment status, captain’s details, team categories and team questions, race number and contact and role details for Team Member 1, 2, 3 etc.
Obviously the team report will vary based on what kind of team set up that you have for your event and will not only display paid team members, but unpaid and incomplete records too - which is very handy for the pre-event scramble to finalise teams if you have allowed for incomplete teams.
Optional Items Report
The Optional Items Report gives an overall summary of each optional item and the total quantity of each of these items purchased. In terms of practical application, this is the kind of report that you would use to get a quick high level view of how much / stock / quantities of optional items sold, remaining, unpaid and so on. It's a handy one to be comfortable with if your event has multiple optional items and variants.
Timing Report
Or race number report - this report only shows once you have allocated race numbers to your event. We're fairly confident that your event timing provider will be your new bestie when you share this with them! With one row per race number (or according to your event settings), team member details and included items this report is a handy one for your on the day rego staff too.
Customising Reports
To customise any report simply click on the “Customise” button for the standard report which is closest to what you are looking for.
For instance, if you wanted to run a win back campaign for lapsed registrants and you needed a list of all unpaid or incomplete records in your event to email them directly. You would go to the Simple Participant list, select the customise option scroll down beyond the Report Fields section to the Filtering section.
Under the Filtering section you can deselect Paid and Re-Entered and select Unpaid and Incomplete. Once you are happy with the data the report will be capturing, update the report name and description so you don't forget what the report is and then press save.
The system will then take you back to the Reports home page, where you will now see your customised report and can download the report to your computer. Et voila! Reactivation campaign here we come! For the visual tutorial jump over to our solutions page!
If you’re still with us, thanks for reading! It’s a bland topic but so utterly important for smart, effective and efficient event management. Next time we’ll take a deeper dive into excel and share some of our back office event hacks! But until then catch ya!